Hercules and Slackware (slack/390) - Part 11
...Continuing from Part 10
Final configuration and IPLing Slack390
The setup program configured our network, but missed some important details we need to get our network up and running.
1) Loading the network adapter kernel module at boot time
Since we selected to use the LCS we need to load the kernel module that supports it.
This is done by editing the /etc/rc.d/rc.modules file.
I personally prefer VI as an editor, but use whatever you're more familiar with (and is available in our limited 'live'-system).
If you use VI, search for 'lcs' (hint: open the file with 'vi /etc/rc.d/rc.modules' and type '/lcs' + Enter - it's at line 69) and remove the '#' at the beginning of the line that reads:
(hint: press 'Home' to go to the beginning of the line, 'd' + 'space' to delete the '#')
Now save the modified file (hint: press ':' + 'wq' + Enter)
2) Setting the options for the lcs kernel module
We also need to tell the lcs kernel module the device number of our emulated LCS.
So we create a /etc/modprobe.conf file with the needed information by typing this line:
3) Repeating the chandev information from parmfile.txt
To finish, we need to create the /etc/chandev.conf file with the information we put in our original parmfile.txt:
4) Shutdown our system
Now everything is ready to shutdown our running system, so just enter:
and press Enter.
Our telnet session will be closed so we'll change to the Hercules console, where we'll see the following lines:

Now quit from Hercules to guarantee a clean start by typing 'quit' after the Commmand ==> prompt.
5) IPLing our Slack/390 installation for the first time
Start Hercules again and IPL from the first DASD (device number 0120) by typing 'ipl 120' after the Commmand ==> prompt.
Since we selected to start the SSH daemon at boot time, Slack/390 will create three public / private key pairs, one each for rsa1, dsa and rsa.
This will take some time (especially the dsa key pair), depending on your processing power (like 10 to 30 minutes).
You'll see - amongst others - the following lines on the Hercules console:
This only occurs the first time you IPL your Slack/390. All the other times it will be a lot faster.
The last line on the Hercules console will be:
This means that Slack/390 was loaded and is ready to receive connections.
6) Connecting to your Slack/390 system
Now go back to your normal console on your host system.
For security reasons, telnet sessions are not allowed, so we'll have to use ssh from now on.
Connect to your Slack/390 system from your host system (or any other system on your network) with the following command:
The first time you connect to your new Slack/390 system you'll see the following lines:
Simply answer 'yes' to continue and you'll see these lines:
Enter the password for root you defined and you'll get this prompt:
Congratulations! You finished installing Slack/390 on your (emulated) mainframe!
7) Where to go from here
First of all, create a normal user with 'adduser' so that you don't have to use root to login to your mainframe.
And then? Well, depending on your processing power, there are many fun things to do, like configuring the http daemon to run a webserver on your mainframe, with mysql. Or configure samba, so that you can access it from Windows desktops.
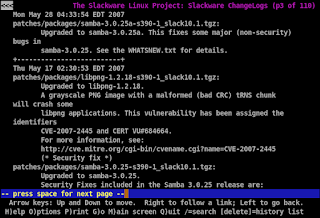
Or start browsing the web with lynx to check for updates of Slack/390:

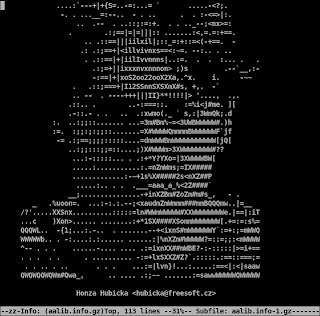
Oh, but you complain that there are no graphics?
We have graphics on our mainframe! Just enter 'info aalib' and you'll see what I mean:

Final configuration and IPLing Slack390
The setup program configured our network, but missed some important details we need to get our network up and running.
1) Loading the network adapter kernel module at boot time
Since we selected to use the LCS we need to load the kernel module that supports it.
This is done by editing the /etc/rc.d/rc.modules file.
I personally prefer VI as an editor, but use whatever you're more familiar with (and is available in our limited 'live'-system).
If you use VI, search for 'lcs' (hint: open the file with 'vi /etc/rc.d/rc.modules' and type '/lcs' + Enter - it's at line 69) and remove the '#' at the beginning of the line that reads:
#/sbin/modprobe lcs(hint: press 'Home' to go to the beginning of the line, 'd' + 'space' to delete the '#')
Now save the modified file (hint: press ':' + 'wq' + Enter)
2) Setting the options for the lcs kernel module
We also need to tell the lcs kernel module the device number of our emulated LCS.
So we create a /etc/modprobe.conf file with the needed information by typing this line:
echo "options lcs 0xf00,1" > /etc/modprobe.conf3) Repeating the chandev information from parmfile.txt
To finish, we need to create the /etc/chandev.conf file with the information we put in our original parmfile.txt:
echo "lcs0,0xf00,0xf01" > /etc/chandev.conf4) Shutdown our system
Now everything is ready to shutdown our running system, so just enter:
haltand press Enter.
Our telnet session will be closed so we'll change to the Hercules console, where we'll see the following lines:

Now quit from Hercules to guarantee a clean start by typing 'quit' after the Commmand ==> prompt.
5) IPLing our Slack/390 installation for the first time
Start Hercules again and IPL from the first DASD (device number 0120) by typing 'ipl 120' after the Commmand ==> prompt.
Since we selected to start the SSH daemon at boot time, Slack/390 will create three public / private key pairs, one each for rsa1, dsa and rsa.
This will take some time (especially the dsa key pair), depending on your processing power (like 10 to 30 minutes).
You'll see - amongst others - the following lines on the Hercules console:
Starting OpenSSH SSH daemon:  /usr/sbin/sshd
Generating public/private rsa1 key pair.
Generating public/private dsa key pair.
Generating public/private rsa key pair.
This only occurs the first time you IPL your Slack/390. All the other times it will be a lot faster.
The last line on the Hercules console will be:
bash-3.00#This means that Slack/390 was loaded and is ready to receive connections.
6) Connecting to your Slack/390 system
Now go back to your normal console on your host system.
For security reasons, telnet sessions are not allowed, so we'll have to use ssh from now on.
Connect to your Slack/390 system from your host system (or any other system on your network) with the following command:
ssh root@192.168.1.162The first time you connect to your new Slack/390 system you'll see the following lines:
The authenticity of host '192.168.1.162 (192.168.1.162)' can't be established.
RSA key fingerprint is df:27:56:56:4b:c3:30:aa:c5:dc:94:2e:21:93:c3:af.
Are you sure you want to continue connecting (yes/no)?
Simply answer 'yes' to continue and you'll see these lines:
Warning: Permanently added '192.168.1.162' (RSA) to the list of known hosts.
root@192.168.1.162's password:
Enter the password for root you defined and you'll get this prompt:
Linux 2.4.29.
root@herc-slack:~#
Congratulations! You finished installing Slack/390 on your (emulated) mainframe!
7) Where to go from here
First of all, create a normal user with 'adduser' so that you don't have to use root to login to your mainframe.
And then? Well, depending on your processing power, there are many fun things to do, like configuring the http daemon to run a webserver on your mainframe, with mysql. Or configure samba, so that you can access it from Windows desktops.
Or start browsing the web with lynx to check for updates of Slack/390:

Oh, but you complain that there are no graphics?
We have graphics on our mainframe! Just enter 'info aalib' and you'll see what I mean:


2 Comments:
Because we are still running a "live distro" at this point, In step 1 line 4, I believe that the correct file to change should be /mnt/etc/rc.d/rc.modules, vs. /etc/rc.d/rc.modules(which doesn't exist yet)
Well done Niels!!!
v/r,
robmckennon at gmail dot com
Uhm, I guess you're right here. :)
Thanks for the correction!
Post a Comment
Subscribe to Post Comments [Atom]
<< Home