Hercules and Slackware (slack/390) - Part 6
...Continuing from Part 5
Preparing our DASDs
Before we can install Slack/390 on our local storage, we need to format and partition our devices, just like on a normal desktop.
Remember we created two DASDs and that in GNU/Linux they are called /dev/dasda and /dev/dasdb
The partitions on /dev/dasda will be named /dev/dasda1, /dev/dasda2, etc.
We log in as root in our telnet session and start to work!
1) Formatting DASDs
Slack/390 comes with a special utility to format out DASDs called dasdfmt
Let's format our first device:
- -b 4096 defines the block size
- -f /dev/dasda defines our first DASD
When asked if we are sure, answer 'yes'.
After a short pause (after all, our drives are compressed, so there is not much to do), we'll see the following result:
Repeat the same procedure for our second DASD:
Again, answer with 'yes' and wait for the result.
2) Partitioning DASDs
The partitioning program for DASDs is very similar to fdisk, so experienced Slackware installers should have no problem at all here.
Start the utility with:
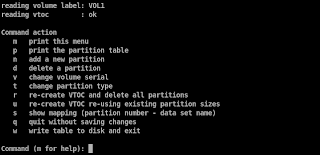
The usual menu comes up:

- type 'n' to create a new partition
- press enter to accept the default starting cylinder
- press enter to accept the default last cylinder
- press 'w' to write the partition table to the DASD and exit
We just created a single partition of the type 'linux' occupying the whole device.
In a real-world situation we would create a swap partition, but since we're on an emulator, this is a bit useless.
Repeat the same procedure for our second DASD:
- type 'n' to create a new partition
- press enter to accept the default starting cylinder
- press enter to accept the default last cylinder
- press 'w' to write the partition table to the DASD and exit
Next post: Entering setup!
Preparing our DASDs
Before we can install Slack/390 on our local storage, we need to format and partition our devices, just like on a normal desktop.
Remember we created two DASDs and that in GNU/Linux they are called /dev/dasda and /dev/dasdb
The partitions on /dev/dasda will be named /dev/dasda1, /dev/dasda2, etc.
We log in as root in our telnet session and start to work!
1) Formatting DASDs
Slack/390 comes with a special utility to format out DASDs called dasdfmt
Let's format our first device:
# dasdfmt -b 4096 -f /dev/dasda- -b 4096 defines the block size
- -f /dev/dasda defines our first DASD
When asked if we are sure, answer 'yes'.
After a short pause (after all, our drives are compressed, so there is not much to do), we'll see the following result:
Finished formatting the device.
Rereading the partition table... ok
Repeat the same procedure for our second DASD:
# dasdfmt -b 4096 -f /dev/dasdbAgain, answer with 'yes' and wait for the result.
2) Partitioning DASDs
The partitioning program for DASDs is very similar to fdisk, so experienced Slackware installers should have no problem at all here.
Start the utility with:
# fdasd /dev/dasdaThe usual menu comes up:

- type 'n' to create a new partition
- press enter to accept the default starting cylinder
- press enter to accept the default last cylinder
- press 'w' to write the partition table to the DASD and exit
We just created a single partition of the type 'linux' occupying the whole device.
In a real-world situation we would create a swap partition, but since we're on an emulator, this is a bit useless.
Repeat the same procedure for our second DASD:
# fdasd /dev/dasdb- type 'n' to create a new partition
- press enter to accept the default starting cylinder
- press enter to accept the default last cylinder
- press 'w' to write the partition table to the DASD and exit
Next post: Entering setup!


0 Comments:
Post a Comment
Subscribe to Post Comments [Atom]
<< Home