Older Slackware versions (VI)
Last October I wrote some posts about installing older Slackware versions on VMware. I have since sort of abandoned VMware for several reasons:
There are at least two Free, Open Source alternatives available: VirtualBox and Qemu. Each one has its advantages and disadvantages.
VirtualBox has a nice user-interface and easy to configure options. The open-source version however does not include USB emulation.
Qemu, on the other hand is extremely flexible, can emulate several types of mice, network cards, usb-devices, and is not only a virtualization system but also an emulator for other platforms, like ARM, PowerPC, etc.
But it has no graphical user interface and is complete command-line driven.
This "disadvantage" actually can be an advantage. Sometimes I want to create a simple shortcut that can start a virtual machine without clicking too many buttons.
With Qemu I can create a shell script that starts Qemu with the right parameters and loads my virtual machine with just one click.
But to get back to the original subject...
This week I learned about the fact that an even older version of Slackware was available - Slackware 1.01 ! I actually had read about it some time ago but had forgotten to check it out. I did some research on Google and found out that it can be downloaded from several sites. Since most appeared to be private, non-professional sites, I won't mention them here so that these people won't have bandwidth problems because of me.
But if you're interested, just Google for Slackware 1.01
I decided that it would be a nice compatibility test for Qemu :)
To install a complete version, with X, you'll also need to download a version of the forefather of Slackware, SLS, as the available Slackware 1.01 does not come with the 'X' disks. But the proper Slackware installation script tells us that the SLS disks can be used and those are still readily available on the ibiblio.org ftp site. I used the SLS-1.03 version, as it was released two days before Slackware 1.01 (we're talking about August 1993 here, almost 16 years ago...)
update
After several requests, I decided to put Slackware 1.01 and the X-disks from SLS 1.03 on my site for download:
Slackware 1.01
X-disks from SLS 1.03
So after you downloaded Slackware 1.01 and SLS 1.03, let's start installing our new virtual machine!
But first transform the downloaded folders (A2, A3, A4, etc.) in disk images that can be read by Qemu.
You can do this by creating an empty image with:
mounting it with:
and then copying the files to /mnt/floppy.
In my post about Slackware 1.1.2 I showed a little script to make life easier, but it has to be adapted a bit to work with disk numbers greater than 9. I'll leave that as an exercise to the reader. ;)
1. Preparing the environment
The complete installation of Slackware 1.01 + X + TCL takes up just over 100MB on a hard drive, so I suggest creating a virtual drive of at least 150MB, so that we have some space left to play around.
I created mine with:
Next I created a little shell script to start Qemu with some extra parameters:
The Qemu documentation explains all options, but I will enter in some details here:
64MB of memory is enough for Slackware 1.01. remember that we're talking 1993 here...
Qemu by default emulates a PS/2 mouse, but the X included with SLS did not recognize it, so we'll work with a Microsoft Serial Mouse
This line is to make Qemu boot from the disk image. After installation, you'll need to remove this line!
I haven't been able to set up networking yet, but at least the NE2000 ISA adapter was recognized by Slackware 1.01 :)
Before invoking the script, we'll need the location of the Slackware disk images, especially the first one (A1).
2. Starting Qemu
Invoke the script you just saved and you'll see the following screen:
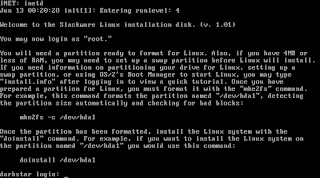
As the instructions say, we can log in as root.
Then we need to create a partition, format it and start the installation script.
3. Partitioning the hard drive
Since this is a virtual machine with 64MB of RAM (a lot for those days), I didn't create a swap partition but just one primary partition the size of our virtual hard drive.
Create the partition with:
and follow the menu...
Then format the new partition as suggested by Patrick with:
4. Start installing!
Now we are ready to start the installation process with:
First it will ask us where to install from - our option is to install from "Floppy Disks".
(Notice that there is even an option to install from tape!)
The second question is interesting:
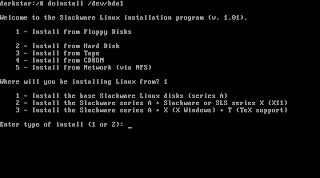
Since I couldn't find the Slackware X series, I used the disks from SLS.
The prompt gives the option to select "(1 or 2)" but I entered "3" to install TeX as well :)
Now you will be prompted for all the packages. Some are required and will be installed automatically - this was actually one of the improvements Pat made...
You will ave to "insert" all the virtual floppy disks during the installation.
In Qemu you can switch to the command console with "ctrl-alt-2" and type:
and then just switch back to your installating with "ctrl-alt-1".
After the "A" series, we'll go through the "X" series and finally the "T" series.
Be careful ate after the t3 disk with the following question:
5. Creating a boot disk
After all the disks, you'll see the following prompt:
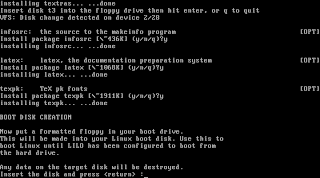
Change your virtual floppy first in Qemu or you will overwrite your t3 disk!
Then just press enter and the boot disk will be created.
6. Configuration
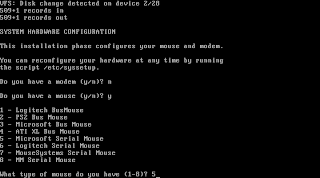
Now you can configure a modem (which we probably do not have in our virtual machine) and a mouse.
To configure your mouse, first go to the Qemu command screen (ctrl-alt-2) and set our mouse to the emulated Microsoft Serial Mouse we configured in the script that starts Qemu:
should show something like:
We can switch to the Microsoft Mouse with:
Now switch back to your installation with ctrl-alt-1 and select "5" (Microsoft Serial Mouse) from this screen:
When it asks for the serial port, just select the first one, as that is where Qemu will emulate your mouse.
Now we are asked about LILO:
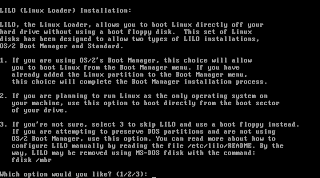
Since we are only installing Slackware on this drive, we can simply choose "2" here.
After this, we get back to the prompt telling us we can reboot our system.
Go to the Qemu command screen and eject the floppy disk with:
Go back to your Linux screen with ctrl-alt-1 and reboot your newly installed Slackware 1.01 with
7. First boot and post-installation
And we're in Slackware 1.01!
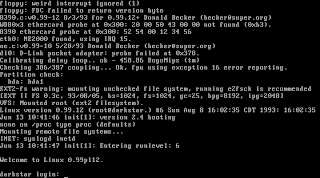
Check if your screen says that NE2000 network card was found (if not, check the script you used to start Qemu).
As you can see, our kernel version is 0.99, patch level 12.
This kernel version, as the one I tested in Slackware 1.1.2 (patch level 15), has a problem that makes our virtual machine take up as much as 100% of CPU time on the host machine (or 50% on a dual-core). This also happens with older Windows versions (Windows 98 and older) in VMware, Qemu, VirtualBox, etc.
It is caused by not using the HLT instruction when there is nothing to do. There are some specific utilities to solve this with Windows in virtual machines, but not for the older Linux kernels. I am not sure when exactly this has been solved in the kernel...
Also note that the hostname of this system is "darkstar", as is still the default in the newest versions. In the modern versions the hostname is set in /etc/rc.M, where "darkstar" is used if no name had been specified during setup.
In Slackware 1.01 it is set in /etc/rc.local
For now, let's login as root - no password is needed.
As was mentioned during the installation (and of course you paid attention to everything that flashed by on your screen ;) ), we need to run a script to set the correct permissions for the sample users:
This is to make sure that "gonzo", "satan" and "snake" can access their home folders and read their mail. Of course, "satan" lives in /home/hell and "snake" lives in /home/pit :D
Feel free to wander around in your new Slackware 1.01 before going to the next step!
8. Configuring X
To use X we will need to do some configuration...
The version of X we installed from the SLS disks - XFree86 1.3 - works a bit different from modern X versions. There were no drivers for video cards - X was compiled for a specific card. SLS supplied two versions, one for SVGA cards and one for monochrome VGA cards.
Qemu can emulate several VGA chipsets, but I could not get any of them to work with this XFree86 server. So I used the monochrome XFree86 server instead.
To change the default server, we need to change a symbolic link, logged in as root:
Now, login as the sample user "gonzo" (or use snake or satan if you prefer...).
Simly start X with>
And you're up-and-running!
If, like me, you don't like this "virtual desktop" larger than your vga resolution, you can change this behavior. First copy the standard Xconfig configuration file to your home directory, and make it writable:
Then edit this file with your favorite editor (vi & joe are included with Slackware 1.01).
In the section that defines the "vga2" (monochrome) server, change the line for the "Virtual" resolution from "800 600" to "640 480".
Now you can run startx again and play some games:

If I have some time again, I'll try to configure the network. It is quite different compared to the newer versions :)
- It might be free for personal use, but it is not Open software
- It is a hassle to keep it functioning with every kernel change
- The latest versions need PAM, which can be installed on Slackware, but is not included
There are at least two Free, Open Source alternatives available: VirtualBox and Qemu. Each one has its advantages and disadvantages.
VirtualBox has a nice user-interface and easy to configure options. The open-source version however does not include USB emulation.
Qemu, on the other hand is extremely flexible, can emulate several types of mice, network cards, usb-devices, and is not only a virtualization system but also an emulator for other platforms, like ARM, PowerPC, etc.
But it has no graphical user interface and is complete command-line driven.
This "disadvantage" actually can be an advantage. Sometimes I want to create a simple shortcut that can start a virtual machine without clicking too many buttons.
With Qemu I can create a shell script that starts Qemu with the right parameters and loads my virtual machine with just one click.
But to get back to the original subject...
This week I learned about the fact that an even older version of Slackware was available - Slackware 1.01 ! I actually had read about it some time ago but had forgotten to check it out. I did some research on Google and found out that it can be downloaded from several sites. Since most appeared to be private, non-professional sites, I won't mention them here so that these people won't have bandwidth problems because of me.
But if you're interested, just Google for Slackware 1.01
I decided that it would be a nice compatibility test for Qemu :)
To install a complete version, with X, you'll also need to download a version of the forefather of Slackware, SLS, as the available Slackware 1.01 does not come with the 'X' disks. But the proper Slackware installation script tells us that the SLS disks can be used and those are still readily available on the ibiblio.org ftp site. I used the SLS-1.03 version, as it was released two days before Slackware 1.01 (we're talking about August 1993 here, almost 16 years ago...)
update
After several requests, I decided to put Slackware 1.01 and the X-disks from SLS 1.03 on my site for download:
Slackware 1.01
X-disks from SLS 1.03
So after you downloaded Slackware 1.01 and SLS 1.03, let's start installing our new virtual machine!
But first transform the downloaded folders (A2, A3, A4, etc.) in disk images that can be read by Qemu.
You can do this by creating an empty image with:
mkfs.msdos -C disk_xxx.img 1440mounting it with:
mount -o loop disk_xxx.img /mnt/floppyand then copying the files to /mnt/floppy.
In my post about Slackware 1.1.2 I showed a little script to make life easier, but it has to be adapted a bit to work with disk numbers greater than 9. I'll leave that as an exercise to the reader. ;)
1. Preparing the environment
The complete installation of Slackware 1.01 + X + TCL takes up just over 100MB on a hard drive, so I suggest creating a virtual drive of at least 150MB, so that we have some space left to play around.
I created mine with:
$ qemu-img create -f qcow2 slack101.img 200MNext I created a little shell script to start Qemu with some extra parameters:
#!/bin/bash

# Start qemu w/ sudo, so that allowed users can run emulation
sudo qemu \
  -localtime \
  -m 64M \
  -serial msmouse \
  -vga std \
  -fda disk_a1.img \
  -hda slack101.img \
  -net nic,model=ne2k_isa -net tap,ifname=tap1 \
  &
The Qemu documentation explains all options, but I will enter in some details here:
-m 64M:64MB of memory is enough for Slackware 1.01. remember that we're talking 1993 here...
-serial msmouse:Qemu by default emulates a PS/2 mouse, but the X included with SLS did not recognize it, so we'll work with a Microsoft Serial Mouse
-fda disk_a1.img:This line is to make Qemu boot from the disk image. After installation, you'll need to remove this line!
-net nic,model=ne2k_isa:I haven't been able to set up networking yet, but at least the NE2000 ISA adapter was recognized by Slackware 1.01 :)
Before invoking the script, we'll need the location of the Slackware disk images, especially the first one (A1).
2. Starting Qemu
Invoke the script you just saved and you'll see the following screen:

As the instructions say, we can log in as root.
Then we need to create a partition, format it and start the installation script.
3. Partitioning the hard drive
Since this is a virtual machine with 64MB of RAM (a lot for those days), I didn't create a swap partition but just one primary partition the size of our virtual hard drive.
Create the partition with:
fdisk /dev/hda/and follow the menu...
Then format the new partition as suggested by Patrick with:
mk2efs -c /dev/hda14. Start installing!
Now we are ready to start the installation process with:
doinstall /dev/hda1First it will ask us where to install from - our option is to install from "Floppy Disks".
(Notice that there is even an option to install from tape!)
The second question is interesting:

Since I couldn't find the Slackware X series, I used the disks from SLS.
The prompt gives the option to select "(1 or 2)" but I entered "3" to install TeX as well :)
Now you will be prompted for all the packages. Some are required and will be installed automatically - this was actually one of the improvements Pat made...
You will ave to "insert" all the virtual floppy disks during the installation.
In Qemu you can switch to the command console with "ctrl-alt-2" and type:
change floppy0 <path-to-your-disk-image>and then just switch back to your installating with "ctrl-alt-1".
After the "A" series, we'll go through the "X" series and finally the "T" series.
Be careful ate after the t3 disk with the following question:
5. Creating a boot disk
After all the disks, you'll see the following prompt:

Change your virtual floppy first in Qemu or you will overwrite your t3 disk!
Then just press enter and the boot disk will be created.
6. Configuration
Now you can configure a modem (which we probably do not have in our virtual machine) and a mouse.
To configure your mouse, first go to the Qemu command screen (ctrl-alt-2) and set our mouse to the emulated Microsoft Serial Mouse we configured in the script that starts Qemu:
info miceshould show something like:
Mouse devices available:
  Mouse #0: QEMU Microsoft Mouse
* Mouse #1: QEMU PS/2 Mouse
We can switch to the Microsoft Mouse with:
mouse_set 0Now switch back to your installation with ctrl-alt-1 and select "5" (Microsoft Serial Mouse) from this screen:

When it asks for the serial port, just select the first one, as that is where Qemu will emulate your mouse.
Now we are asked about LILO:

Since we are only installing Slackware on this drive, we can simply choose "2" here.
After this, we get back to the prompt telling us we can reboot our system.
Go to the Qemu command screen and eject the floppy disk with:
eject floppy0Go back to your Linux screen with ctrl-alt-1 and reboot your newly installed Slackware 1.01 with
reboot7. First boot and post-installation
And we're in Slackware 1.01!

Check if your screen says that NE2000 network card was found (if not, check the script you used to start Qemu).
As you can see, our kernel version is 0.99, patch level 12.
This kernel version, as the one I tested in Slackware 1.1.2 (patch level 15), has a problem that makes our virtual machine take up as much as 100% of CPU time on the host machine (or 50% on a dual-core). This also happens with older Windows versions (Windows 98 and older) in VMware, Qemu, VirtualBox, etc.
It is caused by not using the HLT instruction when there is nothing to do. There are some specific utilities to solve this with Windows in virtual machines, but not for the older Linux kernels. I am not sure when exactly this has been solved in the kernel...
Also note that the hostname of this system is "darkstar", as is still the default in the newest versions. In the modern versions the hostname is set in /etc/rc.M, where "darkstar" is used if no name had been specified during setup.
In Slackware 1.01 it is set in /etc/rc.local
For now, let's login as root - no password is needed.
As was mentioned during the installation (and of course you paid attention to everything that flashed by on your screen ;) ), we need to run a script to set the correct permissions for the sample users:
/etc/sampleuseraddThis is to make sure that "gonzo", "satan" and "snake" can access their home folders and read their mail. Of course, "satan" lives in /home/hell and "snake" lives in /home/pit :D
Feel free to wander around in your new Slackware 1.01 before going to the next step!
8. Configuring X
To use X we will need to do some configuration...
The version of X we installed from the SLS disks - XFree86 1.3 - works a bit different from modern X versions. There were no drivers for video cards - X was compiled for a specific card. SLS supplied two versions, one for SVGA cards and one for monochrome VGA cards.
Qemu can emulate several VGA chipsets, but I could not get any of them to work with this XFree86 server. So I used the monochrome XFree86 server instead.
To change the default server, we need to change a symbolic link, logged in as root:
cd /usr/bin/X11
rm X
ln -s XF86_Mono X
Now, login as the sample user "gonzo" (or use snake or satan if you prefer...).
Simly start X with>
startxAnd you're up-and-running!
If, like me, you don't like this "virtual desktop" larger than your vga resolution, you can change this behavior. First copy the standard Xconfig configuration file to your home directory, and make it writable:
cp /usr/lib/X11/Xconfig $HOME/
chmod 644 Xconfig
Then edit this file with your favorite editor (vi & joe are included with Slackware 1.01).
In the section that defines the "vga2" (monochrome) server, change the line for the "Virtual" resolution from "800 600" to "640 480".
Now you can run startx again and play some games:

If I have some time again, I'll try to configure the network. It is quite different compared to the newer versions :)
posted by niels.horn at
12:15
![]()

0 Comments:
Post a Comment
Subscribe to Post Comments [Atom]
<< Home